Ceph getting acquainted

The two key components:

  • Ceph OSDs: A Ceph OSD Daemon (Ceph OSD) stores data, handles data replication, recovery, backfilling, rebalancing, and provides some monitoring information to Ceph Monitors by checking other Ceph OSD Daemons for a heartbeat. A Ceph Storage Cluster requires at least two Ceph OSD Daemons to achieve an active + clean state when the cluster makes two copies of your data (Ceph makes 3 copies by default, but you can adjust it).
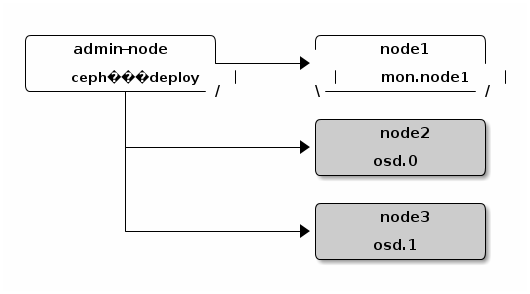
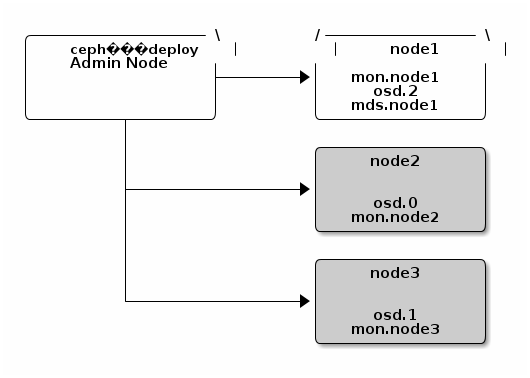
  • Monitors: A Ceph Monitor maintains maps of the cluster state, including the monitor map, the OSD map, the Placement Group (PG) map, and the CRUSH map. Ceph maintains a history (called an “epoch”) of each state change in the Ceph Monitors, Ceph OSD Daemons, and PGs. Ceph uses the Paxos algorithm, which requires a consensus among the majority of monitors in a quorum. With Paxos, the monitors cannot determine a majority for establishing a quorum with only two monitors. A majority of monitors must be counted as such: 1:1, 2:3, 3:4, 3:5, 4:6, etc. Side note: some ceph docs advise not to comingle Montior and Ceph OSD daemons on the same host or you may encounter performance issues. But in deployment guides and the Mellanox high performance paper, they do comingle them. For all test purposes, I plan to comingle them (deploy monitor on ecs nodes) and evaluate performance under load. I am also still trying to estimate how many monitors per Ceph OSD. We'll have 480 Ceph OSDs per rack, and we'll want either 3, 5, or 7 monitors. I'm going to take a shot in the dark and go with 5.
  • RADOS GW This is what provides the S3 and SWIFT API access to Ceph file storage. You can install this on the OSD nodes (simplest) or select a handful of external VMs to run these. You would setup multiple RADOS GW nodes, and place a load balancer like haproxy or nginx/lua_proxy in front of them.

OSD Notes:

OSD Journal Location: stores a daemon's journal by default on /var/lib/ceph/osd/$cluster-$id/journal - on a ECS node, this would be an SSD, which is recommended by CEPH. However, you could point it to an SSD partition instead of a file for even faster performance.

OSD Journal Size: The expected throughput number should include the expected disk throughput (i.e., sustained data transfer rate), and network throughput. For example, a 7200 RPM disk will likely have approximately 100 MB/s. Taking the min() of the disk and network throughput should provide a reasonable expected throughput. Some users just start off with a 10GB journal size. For example:
osd journal size = 10000

OSD's can be removed gracefully: http://docs.ceph.com/docs/master/rados/operations/add-or-rm-osds/#removing-osds-manual

Check Max Threadcount: If you have a node with a lot of OSDs, you may be hitting the default maximum number of threads (e.g., usually 32k), especially during recovery. You can increase the number of threads using sysctl to see if increasing the maximum number of threads to the maximum possible number of threads allowed (i.e., 4194303) will help. For example:
sysctl -w kernel.pid_max=4194303

Crush MAP

The "location" of each Ceph OSD is maintained in a CRUSH MAP.

The CRUSH algorithm determines how to store and retrieve data by computing data storage locations. CRUSH empowers Ceph clients to communicate with OSDs directly rather than through a centralized server or broker. With an algorithmically determined method of storing and retrieving data, Ceph avoids a single point of failure, a performance bottleneck, and a physical limit to its scalability.

CRUSH maps contain a list of OSDs, a list of ‘buckets’ for aggregating the devices into physical locations, and a list of rules that tell CRUSH how it should replicate data in a Ceph cluster’s pools. By reflecting the underlying physical organization of the installation, CRUSH can model—and thereby address—potential sources of correlated device failures. Typical sources include physical proximity, a shared power source, and a shared network. By encoding this information into the cluster map, CRUSH placement policies can separate object replicas across different failure domains while still maintaining the desired distribution. For example, to address the possibility of concurrent failures, it may be desirable to ensure that data replicas are on devices using different shelves, racks, power supplies, controllers, and/or physical locations.

The short of this is that in ceph.conf, you can define a host's location, which subsequently defines the location of each Ceph OSD operating on that host. A location is a collection of key pairs consisting of Ceph predefined types.

root=default row=a rack=a2 chassis=a2a host=a2a1

# types (from narrowest ascending to broadest grouping)
type 0 osd
type 1 host
type 2 chassis
type 3 rack
type 4 row
type 5 pdu
type 6 pod
type 7 room
type 8 datacenter
type 9 region
type 10 root

Each CRUSH type has a value. The higher this value, the less specific the grouping is. So when deciding where to place data chunks or replicants of an object, Ceph OSDs will consult the crush maps to find other Ceph OSDs in other host, chassis, and racks. The fault domain policies can be defined and tweaked.

Zero To Hero Guide : : For CEPH CLUSTER PLANNING


https://www.mellanox.com/related-docs/whitepapers/WP_Deploying_Ceph_over_High_Performance_Networks.pdf - High performance ceph builds.

Ceph 1st Runthrough


ID: 34
post_title: Ceph 1st Runthrough
author: ytjohn
post_date: 2017-04-30 21:42:52
post_excerpt: ""
layout: post
permalink: https://new.yourtech.us/?p=34

published: true

These are just some notes I took as I did my first run through on installing Ceph on some spare ECS Hardware I had access to. Note that currently, no one would actually recommend doing this, but it was a good way for me to get started with Ceph.

Installation

Following this guide http://docs.ceph.com/docs/hammer/start/quick-ceph-deploy/

I set this up the first time in the lab, nodes:

  • ljb01.osaas.lab (admin-node)
  • rain02-r01-01.osaas.lab (mon.node1)
  • rain02-r01-03.osaas.lab (osd.0)
  • rain02-r01-04.osaas.lab (osd.1)

In a more fleshed out setup, I would probably have a dedicated admin node (instead of the jump), and we would start off with the layout like this:

The first 'caveat' was that it tells you to configure a user ("ceph") that can sudo up, which I did. But ceph-deploy attempts to modify the ceph user, which it can't do while ceph is logged in.

[rain02-r01-03][DEBUG ] Setting system user ceph properties..

For step 6, adding OSDs, I diverged again to add disks instead of a directory. http://docs.ceph.com/docs/hammer/rados/deployment/ceph-deploy-osd/

ceph-deploy disk list rain02-r01-01
...
[rain02-r01-01][DEBUG ] /dev/sda :
[rain02-r01-01][DEBUG ]  /dev/sda1 other, 21686148-6449-6e6f-744e-656564454649
[rain02-r01-01][DEBUG ]  /dev/sda2 other, ext4, mounted on /boot
[rain02-r01-01][DEBUG ] /dev/sdaa other, unknown
[rain02-r01-01][DEBUG ] /dev/sdab other, unknown
[rain02-r01-01][DEBUG ] /dev/sdac other, unknown
[rain02-r01-01][DEBUG ] /dev/sdad other, unknown
[rain02-r01-01][DEBUG ] /dev/sdae other, unknown

I will setup sdaa, sdab, and sdac. Note that while I could use a separate disk partition (like an ssd) to maintain the journal, we only have one ssd in ECS hardware and it hosts the OS. So we'll let each disk maintain its own journal.

ceph-deploy disk zap rain02-r01-01:sdaa  # zap the drive
ceph-deploy disk prepare rain02-r01-01:sdaa # format the drive with xfs
ceph-deploy disk activate rain02-r01-01:/dev/sdaa1  # notice we changed to partition path
# /dev/sdaa1              5.5T   34M  5.5T   1% /var/lib/ceph/osd/ceph-0

Repeat those steps for each node and disk you want to activate. Could you imagine doing 32-48 nodes * 60 drives by hand? This seems like a job to be automated.

I also noticed that the drives get numbered sequentially across nodes. I wonder what kind of implications that has for replacing drives or an entire node.

root@rain02-r01-01:~# df -h | grep ceph
/dev/sdaa1              5.5T   36M  5.5T   1% /var/lib/ceph/osd/ceph-0
/dev/sdab1              5.5T   36M  5.5T   1% /var/lib/ceph/osd/ceph-1
/dev/sdac1              5.5T   35M  5.5T   1% /var/lib/ceph/osd/ceph-2
root@rain02-r01-03:~# df -h | grep ceph
/dev/sdaa1              5.5T   35M  5.5T   1% /var/lib/ceph/osd/ceph-3
/dev/sdab1              5.5T   35M  5.5T   1% /var/lib/ceph/osd/ceph-4
/dev/sdac1              5.5T   34M  5.5T   1% /var/lib/ceph/osd/ceph-5
root@rain02-r01-04:~# df -h | grep ceph
/dev/sdaa1              5.5T   34M  5.5T   1% /var/lib/ceph/osd/ceph-6
/dev/sdab1              5.5T   34M  5.5T   1% /var/lib/ceph/osd/ceph-7
/dev/sdac1              5.5T   34M  5.5T   1% /var/lib/ceph/osd/ceph-8

After creating all this, I can do a ceph status.

root@ljb01:/home/ceph/rain-cluster# ceph status
    cluster 4ebe7995-6a33-42be-bd4d-20f51d02ae45
     health HEALTH_WARN
            too few PGs per OSD (14 < min 30)
     monmap e1: 1 mons at {rain02-r01-01=172.29.4.148:6789/0}
            election epoch 2, quorum 0 rain02-r01-01
     osdmap e43: 9 osds: 9 up, 9 in
            flags sortbitwise
      pgmap v78: 64 pgs, 1 pools, 0 bytes data, 0 objects
            306 MB used, 50238 GB / 50238 GB avail
                  64 active+clean

PG's are known as placement groups. http://docs.ceph.com/docs/master/rados/operations/placement-groups/
That page recommends that for 5-10 OSDs, (I have 9) we set this number to 512. I'm defaulted at 64. But then the tool tells me otherwise.

root@ljb01:/home/ceph/rain-cluster# ceph osd pool get rbd pg_num
pg_num: 64
root@ljb01:/home/ceph/rain-cluster# ceph osd pool set rbd pg_num 512
Error E2BIG: specified pg_num 512 is too large (creating 448 new PGs on ~9 OSDs exceeds per-OSD max of 32)

I'll put this down as a question for later and set it to 128.
This does nothing, so I learned what I really need to do is make more pools. I make a new pool, but my HEALTH_WARN has changed to reflect my mistake.

root@ljb01:/home/ceph/rain-cluster# ceph status
    cluster 4ebe7995-6a33-42be-bd4d-20f51d02ae45
     health HEALTH_WARN
            pool rbd pg_num 128 > pgp_num 64
     monmap e1: 1 mons at {rain02-r01-01=172.29.4.148:6789/0}
            election epoch 2, quorum 0 rain02-r01-01
     osdmap e48: 9 osds: 9 up, 9 in
            flags sortbitwise
      pgmap v90: 256 pgs, 2 pools, 0 bytes data, 0 objects
            311 MB used, 50238 GB / 50238 GB avail
                 256 active+clean

There is also a pgp_num to set, so I set that to 128. Now everything is happy and healthy. And I've only jumped from 306MB to 308MB used.

root@ljb01:/home/ceph/rain-cluster# ceph status
    cluster 4ebe7995-6a33-42be-bd4d-20f51d02ae45
     health HEALTH_OK
     monmap e1: 1 mons at {rain02-r01-01=172.29.4.148:6789/0}
            election epoch 2, quorum 0 rain02-r01-01
     osdmap e50: 9 osds: 9 up, 9 in
            flags sortbitwise
      pgmap v100: 256 pgs, 2 pools, 0 bytes data, 0 objects
            308 MB used, 50238 GB / 50238 GB avail
                 256 active+clean

Placing Objects

You can place objects into pools with rados command.

root@ljb01:/home/ceph/rain-cluster# echo bogart > testfile.txt
root@ljb01:/home/ceph/rain-cluster# rados put test-object-1 testfile.txt --pool=pool2
root@ljb01:/home/ceph/rain-cluster# rados -p pool2 ls
test-object-1
root@ljb01:/home/ceph/rain-cluster# ceph osd map pool2 test-object-1
osdmap e59 pool 'pool2' (1) object 'test-object-1' -> pg 1.74dc35e2 (1.62) -> up ([8,5], p8) acting ([8,5], p8)

Object Storage Gateway

Ceph does not provide a quick way to install and configure object storage gateways. You essentially have to install apache, libapache2-mod-fastcgi, rados, radosgw, and create a virtualhost. While you could do this on only a portion of your OSD nodes, it seems like it would make most sense to do it on each OSD node so that each node can be part of the pool.

http://docs.ceph.com/docs/hammer/install/install-ceph-gateway/

Repo change:

http://gitbuilder.ceph.com/apache2-deb-$(lsb_release -sc)-x86_64-basic/ref/master

should be:

http://gitbuilder.ceph.com/ceph-deb-$(lsb_release -sc)-x86_64-basic/ref/master

After installing the packages, you need to start configuring. http://docs.ceph.com/docs/hammer/radosgw/config/

After steps 1-5 (creating and distributing a key), you need to make a storagepool.

root@ljb01:/home/ceph/rain-cluster# ceph osd pool create storagepool1 128 128 erasure default
pool 'storagepool1' created

Creating domain "*.rain.osaas.lab" for this instance. I also had to create /var/log/radosgw before I could start the radosgw service.

After starting radosgw, I had to chown the fastcgi.sock file ownership:

chown www-data:www-data /var/run/ceph/ceph.radosgw.gateway.fastcgi.sock

Next, you go to the admin section to create users.

root@rain02-r01-01:/var/www/html# radosgw-admin user create --uid=john --display-name="John Hogenmiller" [email protected]
{
    "user_id": "john",
    "display_name": "John Hogenmiller",
    "email": "[email protected]",
    "max_buckets": 1000,
    "keys": [
        {
            "user": "john",
            "access_key": "KH6ABIYU7P1AC34F9FVC",
            "secret_key": "OFjRqeMGH26yYX9ggxr8dTyz9KYZMLFK9W5i1ACV"
        }
    ],
    "temp_url_keys": []
}

Or specify a key like we do in other environments.

root@rain02-r01-01:/var/www/html# radosgw-admin user create --uid=cicduser1 --display-name="TC cicduser1" --access-key=cicduser1 --secret-key='5Y4pjcKhjAsmbeO347RpyaVyT6QhV8UHYc5YWaBB'
{
    "user_id": "cicduser",
    "display_name": "TC cicduser1",
    "keys": [
        {
            "user": "cicduser1",
            "access_key": "cicduser1",
            "secret_key": "5Y4pjcKhjAsmbeO347RpyaVyT6QhV8UHYc5YWaBB"
        }
    ]
}

Fun fact: You can set quotas and read/write capabilities on users. It also can do usage statistics for a given time period.

All of the CLI commands can be implemented over API: http://docs.ceph.com/docs/hammer/radosgw/adminops/ - in this, just adding /admin/
(configurable) to the url. You can give any S3 user admin capabilities. It's the same backend authentication for both.

I also confirmed that by installing radosgw on a second node, all user ids and bucket was still available. Clustering confirmed.

Automation

When it comes to automating this, there are several options.

Build our own ceph-formula up into something that fully manages ceph.

Pros

  • It will do what we want it to.

Cons

  • Our current ceph-formula currently only installs packages.
  • Lots of work involved

Refactor public ceph-salt formula to meet our needs.

https://github.com/komljen/ceph-salt

Pros:

  • ceph-salt seems to cover most elements, including orcehstration
  • uses a global_variables.jinja much like we use map.jinja

Cons

  • I'm sure we'll find something wrong with it. (big grin)
  • maintained by 1 person
  • last updated over a year ago

Use Kolla to setup Ceph:

http://docs.openstack.org/developer/kolla/ceph-guide.html

Pros:
* Openstack team might be using Kolla - standardization
* Already well built out
* Puts ceph components into docker containers (though some might consider this a con)

Cons:

  • It's reported that it work primarily on Redhat/Centos; less so on Ubuntu
  • Uses ansible as underlying management - this introduces a secondary management system over ssh
  • Is heavily opinionated based on Openstack architecture (some might say this is a pro)

Use Ansible-Ceph:

https://github.com/ceph/ceph-ansible

Pros:

  • Already well built out
  • Highly flexible/configurable
  • Works on Ubuntu
  • Not opinionated
  • maintained by ceph project
  • large contribution base

Cons:

  • Uses ansible as underlying management - this introduces a secondary management system (in additon to salt) over ssh

Enter the Matrix

I used to be a big proponent of xmpp. However, over the years my enthusiasm has waned for it. I'm not the only one. Essentially, these days if your chat service is not done over HTTP(s), and if it doesn't have persistence, your chat service is now legacy. Yes, I still enjoy IRC, and I think it's great for ephemeral communications. But in this multi-device, mobile world, it's hard to use IRC as a daily driver for my friends and coworkers.

Several months ago, I started looking into chat systems again for a different reason than most - amateur radio. There's this thing in amateur radio called Broadband-Hamnet, which is a wireless mesh network. It's not the first mesh system out there, but it has a really good initiative behind it. The idea behind it is that all nodes are configured to use the same SSID and the network is self configuring. If I stand up a node here at my house, someone else, having never spoken to me before, could deploy a node within range of mine and the two would connect. They would be able to see the node, any services I offer, and use them. DNS and service advertising is built in.

I wanted to come up with some "generic" mesh nodes with a connected server (raspberry pi). The idea that you could grab a couple of these boxes, deploy them in the field and operators would be able to share files, chat, and even video. The big catch was that you never knew what systems would be online at any given time.

I looked into standing up an IRC server with a web front end. This had a problem in that no historical messages would be synchronized during a netjoin. There are a number of P2P chat systems, though most of these require some sort of "bootstrap" system. Even worse, for an amateur radio system under FCC regulation, most of these are focused around encryption. Tox.im would be a good choice, except it would violate the no message obscuring rule of FCC part 97 that governs the Amateur Radio service.

I even started conceiving of a system based on the idea of a pub/sub message queue, except json over http. Nodes would subscribe to a channel and any message posted to a channel would get propagated to all the subscribing nodes. Using twisted, I could also create gateways for standard IRC or XMPP clients.

Well fortunately for me (and you) a group went out and did just that, only much much better than anything I could have put together. Matrix.org has put together a federated chat specification. The concept is really simple - json over http(s). They have a reference implementation called Synapse that is written in twisted. People run homeservers of synapse and will join channel. A channel is shared between all homeservers that subscribe to it and all channel events are propogated until consistency is achieved. This means that if a homeserver joins the channel late, or goes a way for a while, it will eventually achieve a complete history of all message events within the channel.

If you run your server on the default port of either 8008 for HTTP or 8448 of HTTPS, the only DNS record you need is an A record. If you use another port like 443, then you add a DNS SRV record stating the host and port (just like with XMPP).

While the project still has a few rough edges, it is definitely usable today. The most stable implementation is on matrix.org but you can also join my homeserver at matrix.ytnoc.net.